
When it comes to packing for a trip, all my psycho ass OCD-ness comes out to play in full force. I mean… have you seen the Fashionlush packing list?? It’s straight up bat shit cray.
Here’s the thing:: I told you all about my maj travel anxiety, and a lot of that is based on the fact of not having control of the situation & not having just what I need while away from home. So, packing smart is a great way for me to ease my nerves.
If I am not super/over the top/obsessively organized about my packing, there is a good chance that I will end up with 3 duffels stuffed with all the contents of my entire closet & bathroom.
That would be a total travel #FAIL.

As I was looking over my list this past weekend (for the 100th time– remember, this calms my nerves), I realized a flaw in my system. The jewelry. How on earth was I going to keep all my gems & baubles neatly organized in my suitcase?
There is LITERALLY nothing worse than tangled necklaces, the thought of it makes my skin crawl. I searched around online for jewelry rolls, but to be honest– ICK. None of them were doing it for me.
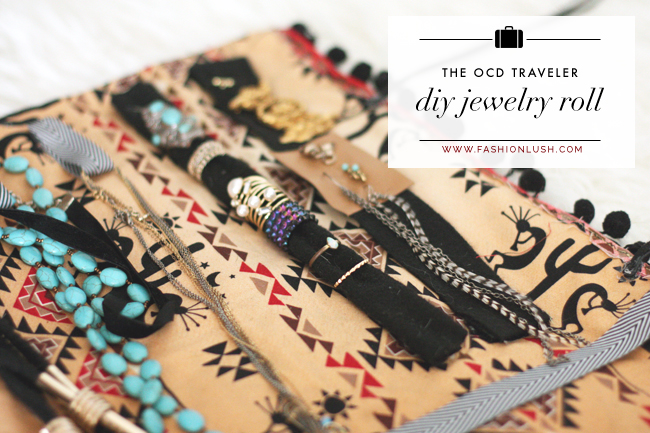
So, I do what I do best & headed to my craft room (aka my closet). I had all the supplies needed to whip up a super stylish lil’ jewelry roll to keep all my necklaces tangle-free, my rings neatly arranged, & my earrings perfectly placed.
Is it weird that being extremely organized kinda gets me high? When this project was done, I was literally floating on cloud 9 w/ stress levels at an all time low, which has been much needed since the past two weeks I’ve been kind of freaking out on the daily.
I would love to hear what you guys think of this project! LMK. ;). xx, E
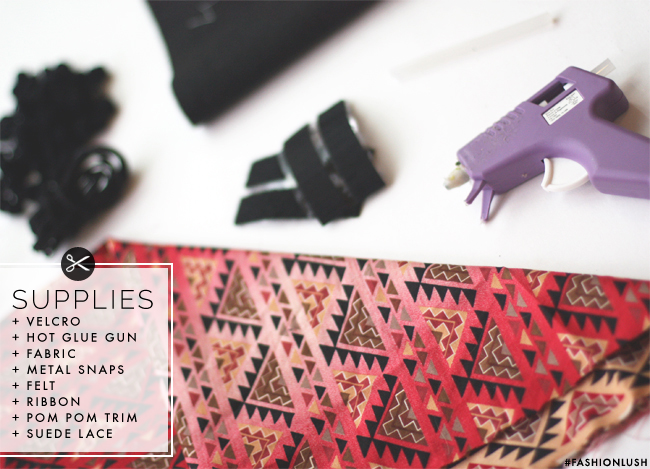
What you will need::
+ A thicker cotton fabric. I used two different patterns so that the inside was different than the outside, mix it up a bit.
+ Velcro
+ Hot glue gun
+ Ribbon
+ Suede lace
+ Metal snaps
+ Pom Pom Trim
+ Sewing machine // optional.
+ Letter beads // optional.
[ The How To:: Level of ease: 5 // Time spent: 1 hour ]
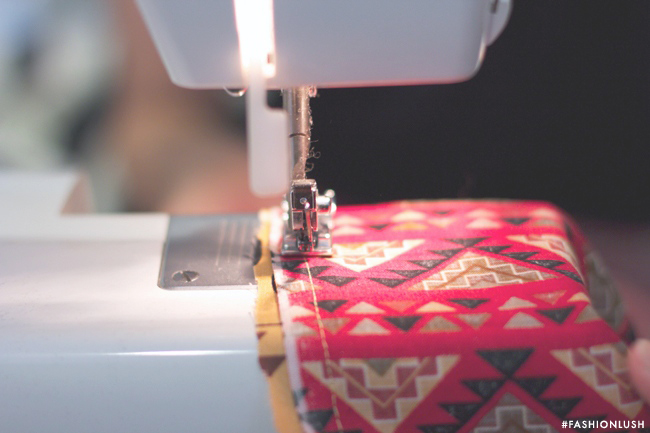
Step 1: First cut two rectangles of your fabric. Pin them so that front (printed side) of each fabric is facing eachother & the wrong side is on the outside. Sew the two longer ends of the fabric top & bottom) together & then one end. Flip inside out. It should now resemble a tote bag. Make sense?
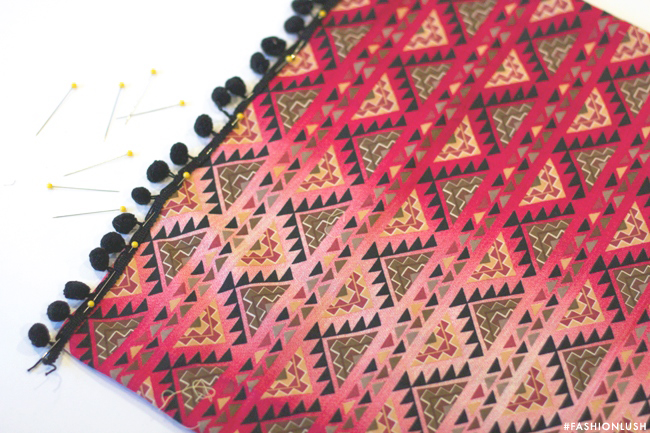
Step 2: Now, fold the remaining open edge over half an inch & pin the pom pom fabric to that edge, sew shut.
Step 3: Cut 5 strips of ribbon about 3″ long each. Glue your snaps to the top & bottom of the ribbon pieces. Glue your ribbons (now w/ snaps attached) to the top edge of your fabric.
Step 4: Now cut a long ribbon the width of your jewelry. Glue one end directly to the fabric. For the other end, glue velcro to the ribbon & the fabric. This is for holding all your long necklaces in place, so when you hang all your necklaces, you can un-velcro this piece from one end & place it over all your necklaces.
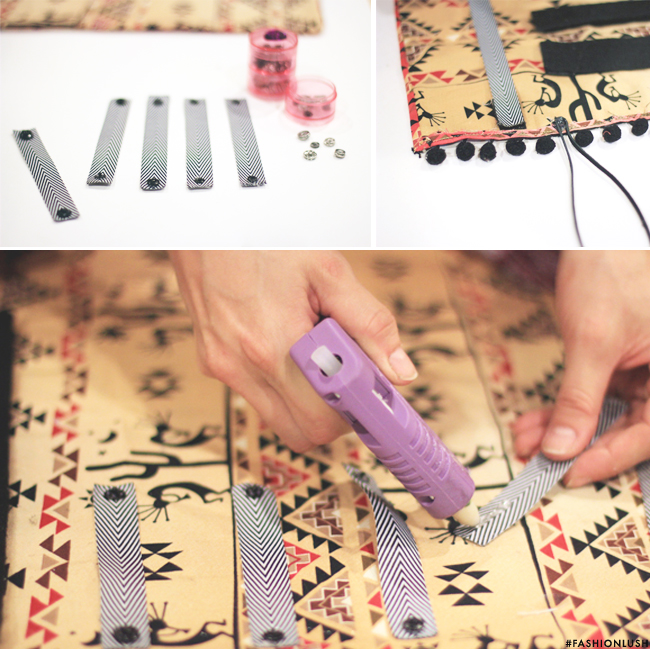
Step 5: Using your felt cut a strip that is about 1.5″ wide & 8″ tall. Same as above, glue one edge & use velcro for the other edge. This is for earrings, so you can un-velcro one edge to stick in all your earrings.
Step 6: Using your felt again, cut a strip the same size as above, but roll it up long ways. Also, same as above, glue one edge & velcro the other. This is for your rings, so you can un-velcro & slide on all your rings.
** for steps 3/4/5, please see image below- it will make more sense!! **
Step 7: Lastly, take two rather long pieces of suede lace & fold them in half. At the center point, glue them on to the pom-pom side of your fabric. This is for tying your roll up when it’s time to pack! You can also throw some bangles around the outside for storage + to hold it together!
Optional: add cute letter beads to your suede lace for some extra flair!!
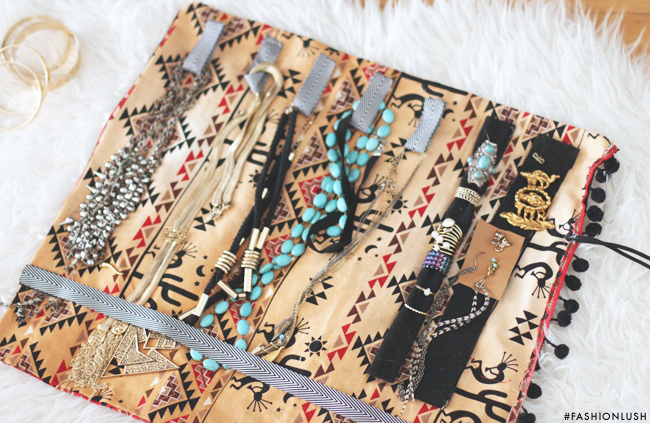
Ta-dah! So chic & fab. Right?!
This is seriously pretty effing cool and if I had the patience I’d totally make it. But you should totally showcase this on your online store when you’re back from your trip cuz I also have a little trip coming up and maybe I’ll snag it from you.
xx daily fashionlusher-er
Oooh! I may do that :) I will let you know!! Thanks for being a daily Fashionlush-er <3 xx, E
This is so fab I’m dying. I am thinking of all the scarves I love but never wear and how they can be repurposed for this. Thanks for the tips!
xoxo
The Accidental Mama
https://theaccidentalmama.com
Scarves would be great! Glad you like it <3 xo
It looks GREAT! Thank you for this post! x
xx, Marina / https://www.marinasirmais.com/
thanks love <3 xx
This is so cool!!! Hahah I wish I was as cool as you but sadly I just hold my jewelry the ratchet way and use an old rolled up magazine that’s taped together. But maybe I’ll try this and hopefully it’ll turn out as rad as yours
That magazine set up doesn’t sound all that bad~!! I think it’s quite creative.
As someone who also has severe travel anxiety, your packing list is a godsend. Thank you so much!
Awww- I am glad to hear. I too have sever travel anxiety, I actually wrote about it here. If you ever need a boost, LMK! xo
This is such a great tutorial. And gorgeous fabric, too! I personally love using jewelry rolls when traveling too, because it keeps me organized and more mindful of my jewelry. Most of the ones you can buy re a tad bulky, though, so it’s great how your version is so much more compact and neat. Well done!
Thanks so much, glad you like it! xx