I’ll admit it. I am a total Insta-addict.
Whoever invented up Instagram, I bow to you.
Being that I do this whole blogging thing, Instagram is more than just a feed of my adorable
dog (although there is plenty of that) or my latest fruit salad (that’s in there too)- it’s a way for me to promote my posts, share my #OOTD’s, & connect with brands/readers all over the world.
That said, I want to keep my feed lookin’ good. I don’t want to post icky, poorly taken photos. I like my pics to be crisp, clean, minimalistic, cohesive & to represent not just me… but Fashionlush as well. Editing is key when having a bad ass Instagram account, & over time I have gotten my style down pat.
I get a lot of people asking me what apps I use/ how I edit / etc., so I figured it’s as good a time as any to let all my photo editing cats of of the bag.
Read on, enjoy, take notes, & be sure to follow me on Instagram to get Fashionlush on the reg.

First you’ve got to take a good picture::
+ Make sure you’ve got a good back-drop. As you can see above, I like to take my pictures on white/clean backgrounds (a poster board works wonders), my gold & white cowhide rug, & sometimes on my floral print bed sheets. Keep it interesting, & feel free to use props (like my american flag!).
+ Lighting is key!! If you take a picture inside at night, it’s not gonna look as great as if you took it during the day. If you’re inside, open the windows & embrace that natural light. Also, avoid shadows by turning whatever your taking pictures of around until those icky shadows disappear.
+ If you’re using an iPhone, play around the with the built in filters when shooting. Sometimes I really love switching it to the “Chrome” filter. It brightens things up & makes your pics much more eye catching.
It’s all about that edit::
I’ve got a handful of apps that I am obsessed with when editing my pictures, so let me break each one down for you!
+ Afterlight: This app is my first step in the editing process, I mainly use it to edit the exposure & brightness of my photos. If your photos are dull/ a little on the dark side, this app lets you brighten things easily.
+ VSCOCam: If I could only choose one app to use for the rest of my life (that’d be painful), it’d be this one. It’s easily my fave. They easily have the best filters. My personal favorites are B1, T1, SE3, & HB1. Some of these aren’t available when you first get the app, but if you scroll through & find the little shopping cart- there are tons of free filters to download.
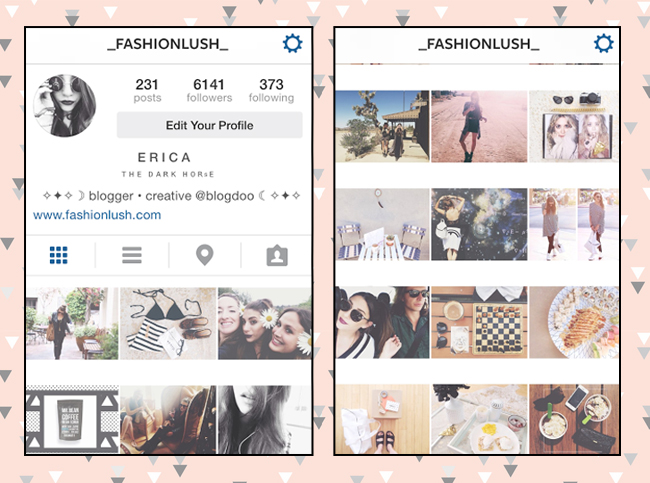
+ Image Blender: This one is also a big one for me. I use it a lot. People always ask how I add patterns over my photos { such as the third picture in the grid above w/ the feathers }. You can find tons of overlay images on Tumblr & then use this app to put them over your photos- it’s a fun way to add some flair to your pics.
+ Twin Collage: When I feel like having a twin, or making a fun collage of two pics- I use this app. It’s easy to use, & I love how you can play with the proportions of each picture. For #OOTD’s I sometimes like to do a mirror image { see picture one in the above grid } using this app.
Lastly, the crop matters::
+ Personally, I like to look at other Instagram’s in the “grid format”. When they are laid out nicely, it’s more visually appealing IMO. I love white space, so I am all about “squaring my photos” using this app. As of late, I have been cropping all of my images the same (4:3 ratio) & squaring them- it’s a commitment, but the final result looks super clean & I dig all that white space.
So, I am aware you guys probably think I am completely bat shit how pre-meditated all my Instagramming is, but hey- atleast I am owning up to it & sharing :). Now that you know how to edit instagram photos like a BOSS, you are well on your way to a killer feed.
Happy Insty-ing peeps!
xx, E


I love seeing what other people do to make their insta feeds look fresh! Always in awe (and envy!) of those with perfect pictures // timidlioness
Aww thanks love <3
Haha – thanks for admitting it’s pre-meditated. Seriously. Like duh! Only way to go :)
Agh loooove this post! I’ve been obsessing over your Insta for ages….I die over the stylized, minimalistic aesthetic! So good. Seriously, so so good.
Thank you so much!! Means a lot, clearly with all the work I put into it :)
Just downloaded them all! Thanks :)
Glad you liked them!!
This is awesome! But most importantly….drum roll please…. How can I change my “bio” format to look like yours does? I tried modifying by logging onto a desktop computer- but it didn’t change!
Thank you :-)
Of course- you can make spaces in your “Notes” on your iPhone & then copy and paste those spaces before your text to center it!
Been obsessed with your insta feed! Always fresh and creative. Your hard work shows and is contagious! Probably a Silly question but…: What app do u use to get the small black and white ’emoji-like’ characters? thanks babe for this amazing post! Besos xox
Thanks so much for all the sweet words love!! The app I use for those icons is called “characters” :)!
Thanks for all the suggestions! I already use Afterlight & VSCO but I’ll try the other two! :D
You’re welcome :)
if u dont mind im asking what filter do u used on ur instagram pics? and I looooooove your feed.
I used VSCOCam A7-A8 :) x
Oh wow your Instagram pictures are amazing! I downloaded all of the apps and i really hope I’ll be able to imprve my instagram-game haha
Thanks girl! Hopefully it helps :) x
The last few times I have put pics on Instagram the white spaces in the photo (a white chair, ice on the hockey rink) turns black. Is this a lighting issue? Do you know ho to correct the issue? The pictures are fine on FB it is just Instagram that turns those spaces black. Any help is appreciated!
That is very strange! Can you send me a link to an example?
Such a great post. Thank you so much for sharing! So, so helpful!
Thank you! I always wonder how people get such a clean looking Instagram and this helps! How long would you say each post takes you?
to be honest- 30 minutes :)
That’s what I figured which is not bad.
Amazing to be a part as a designer. Thanks. Following you